 VENETIAN
 WOODEN
 VERTICAL
 ROLLER
 PERFECT FIT
 ALLUSIONS
 PLEATED BLINDS
 BLACK OUT
 DAY & NIGHT
Measure & Fit
HOW TO MEASURE
VENETIAN/VERTICAL & ALLUSION BLINDS
We recommend you measure top, middle the and bottom of your window, whether exact or recess. This will give you a better idea of your windows dimensions. Always take the smallest measurement. Never assume the measurements will be the same for all of your windows... Every window is different!
EXACT SIZE
Exact fitting blinds will typically hang outside of the windows recess.
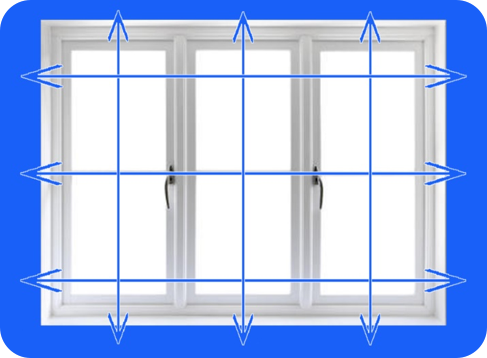
If you choose to measure exact blind size you will need to decide by how much you would like your blind to overlap the recess, and provide those exact measurements of the width and the drop.
Blinds of this nature are made to your exact requirements, so it is important to be sure of the measurements you provide. We will not make any allowances.
RECESS SIZE
Recess fitting blinds will hang on the inside of your recess. To achieve this look you will need to measure the width and drop, from wall to wall, on the inside of the recess.
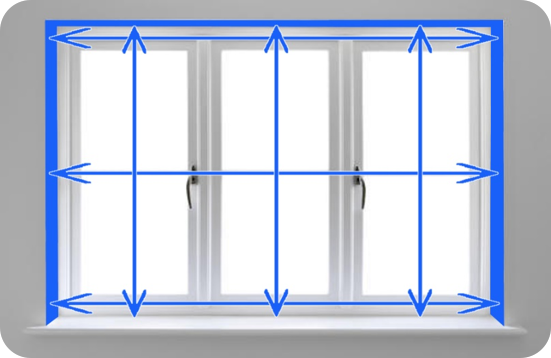
When measuring please take extra care to note any obstructions that may cause an issue when you come to fitting your blind. Obstructions such as window handles, skirting boards, dado rails and tiles are just a few example of what to look out for which may alter the way you measure.
Please note: When ordering recess for any blind type we will make a deduction of 10mm from the width and the drop
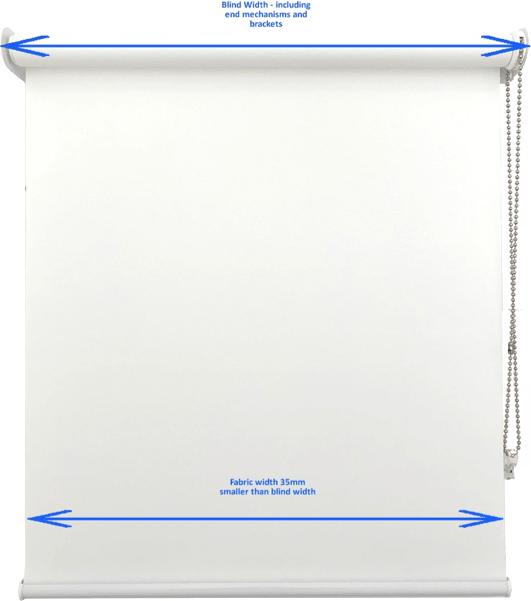
ROLLER BLINDS
When measuring for a roller blind there are 3 measuring options: Exact, Recess and Cloth size.
Exact: Choose this option if fitting outside the window recess. The measurement you provide will be for the entire blind including the mechanisms and the brackets. The fabric will be 35mm less in the width. Please ensure measurements allow for an overlap of the opening.
Recess: Choose this option if fitting inside the window recess. The required deductions will be made to ensure the blind fits perfectly within the recess. The measurements you provide for the width will be from bracket to bracket and the fabric will be 35mm less.
Cloth: Choose this option if the measurements you have are for the fabric/material. The overall blind size will be 35mm wider once the mechanism and brackets have been installed.
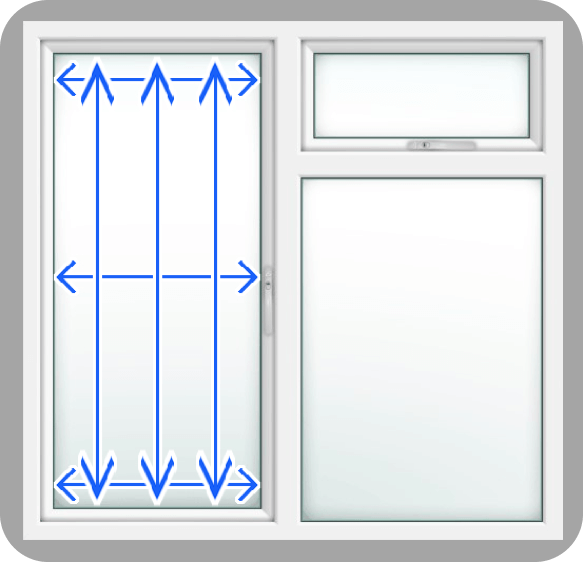
PERFECT FIT VENETIAN BLINDS
Before ordering Perfect Fit blinds, you should check a few things first. Make sure there is 25mm of clearance from the window beading to any obstruction such as handles or vents. Next check the depth of the window from the glass to the frame. To do this, place a credit card onto the glass along its thin edge and measure the depth to the frame with a metal tape measure. The depth should be between 18-30mm. If your depth is outside of this range, please contact us to discuss further options.
When ordering perfect fit blinds it is the size of the visible glass that must be measured. Measurement must not include the rubber bead or any seals.
Download our How to Measure Guide (PDF)
FITTING GUIDE
VENETIAN BLINDS
Decide which method of fixing you require, either TOP FIX or FACE FIX. The blind has been supplied with universal fixing brackets to top fix into the ceiling / lintel directly above the blind or face fix onto the wall or window frame directly behind the blind.
TOP FIXING
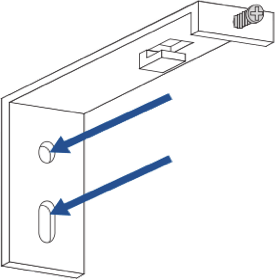
Take a measurement of how far your window handles protrude from your window frame (mm) then add 20mm to that measurement, this is the distance from the window frame you will need to drill to avoid the slats catching your window handles. Use a pencil to mark where the brackets will be positioned. Also ensure that the brackets are not positioned as to affect any of the operating or cord/ladder mechanisms in the headrail.

FACE FIXING
Fix the brackets in the exact place that you took your original measurement from. Use a pencil to mark where the brackets will be positioned. Also ensure that the brackets are not positioned as to affect any of the operating or cord/ladder mechanisms in the headrail.
Note: You cannot face fix into a recess with protruding window handles as there is no space available to allow the blind to hang correctly. If this is the case you will need to use the top fix method.
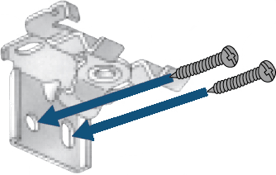
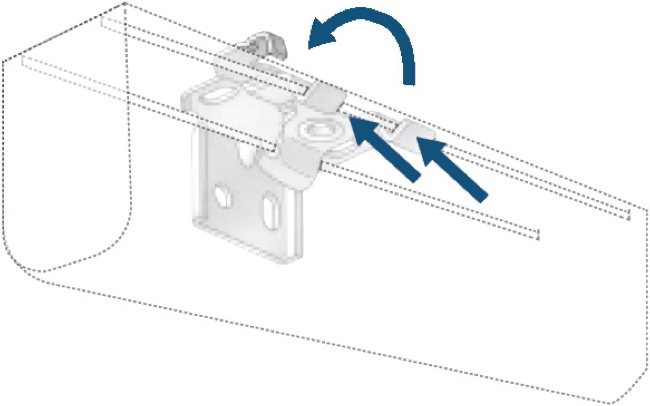
Pull the swing arm of each bracket towards the centre until it is protruding outwards. Locate the headrail between the front and back lips of the bracket and push upwards. Carefully push the swing arm back towards the headrail so that they fit flush and lock the rail in place. Repeat on all brackets. Hook the wand into the control tilter and hang down vertically (ensure wand is not over tightened).
OPERATING THE BLIND
To lower the blind, pull the cord across the face of the blind to release the cord-lock and let the cord slowly slide through your fingers until the blind reaches the desired height. Twist the wand control to adjust the angle of the slats. Slats should be in the open position when raising or lowering the blind.
CHILD SAFETY
The safety cleat should be installed as close to the headrail as possible and not less than 1500mm from the floor. The cord must be fully gathered around the safety cleat when the blind is idle.
Mark the cleats hole locations, drill the marked holes, and secure the safety cleat to the wall using suitable screws and fixings.
Tightly wrap the cords around the cleat in a figure of eight.
WARNING: In the interest of safety, please keep all pull cords and chains out of the reach of children. Move cots, beds and other furniture away from blinds and install safety devices such as cleats and cord tidies to limit access to cords.
FITTINGS
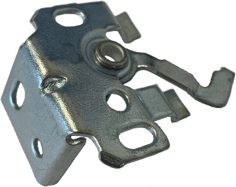
Universal Bracket
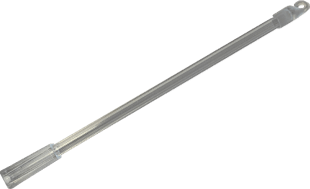
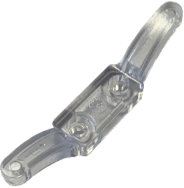
Detachable Tilt Wand
Safety Cleat
Download our Venetian Blinds Fitting Guide (PDF)
VERTICAL BLINDS
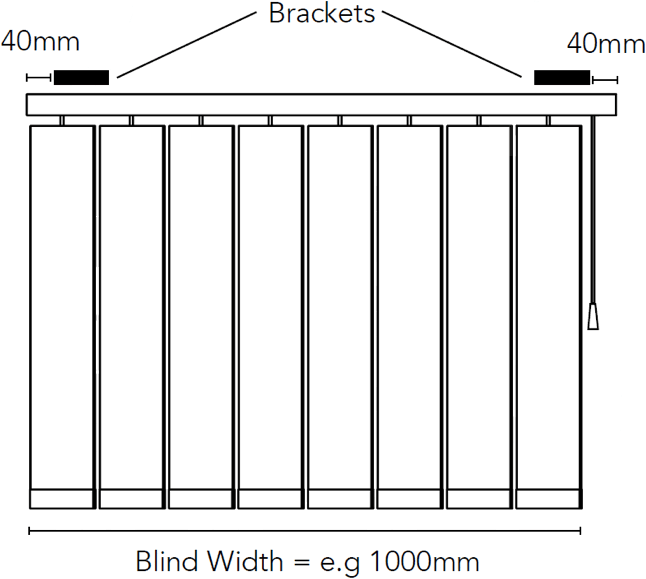
Place a bracket at 40mm from either side of the rail. Distribute any remaining brackets evenly along the rail.
During your ordering process you will have decided whether to use top fix or face fix brackets.
- Up to 1m = 2 brackets
- 1m – 2m = 3 brackets
- 2m – 3m = 4 brackets
- Over 3m = 5 brackets
TOP FIXING
When using top fix brackets, please ensure the distance from the edge of the brackets are at least 55mm away from the surface behind the rail. This allows the louvres to rotate freely without obstruction from the window or wall.
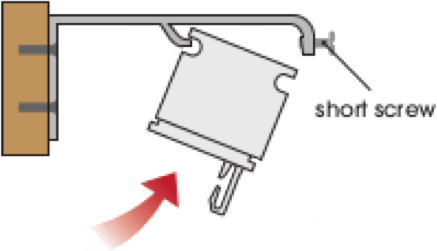
To top fix your blinds, apply the brackets to the top surface of the recess using one screw.
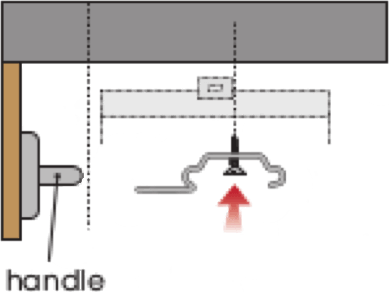
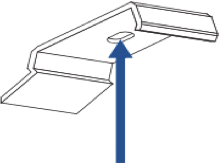
Before applying the headrail, make sure that your controls are on the same side as you requested upon ordering. Tilt the track and insert the front lip of the headrail onto the front lip of the bracket and push up until it clicks into position. Repeat the process with each bracket.
FACE FIXING
Face fixing your brackets means you will be applying them to the facing surface around the window using two screws.
Before applying your headrail, make sure that your controls are on the same side as you requested upon ordering.
Tilt the track to insert the back of the headrail onto the bracket, push into position and tighten the screw to lock the track into place. Repeat the process with each bracket.
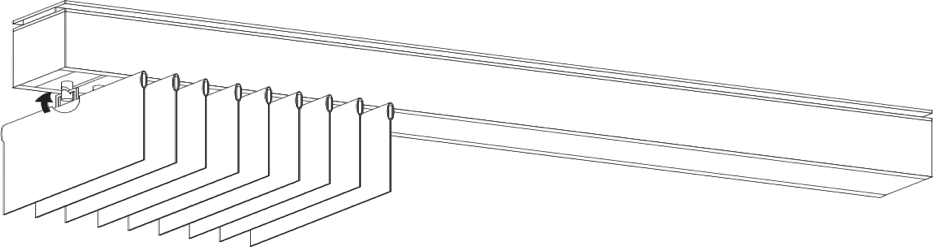
To hang the slats, ensure the hooks are at 90° to the headrail, as per image above. Hook the louvres (slats) onto the rail.
Your vertical blind is fully compliant with the latest safety standards.
It is supplied with a mono control wand that hooks onto the mechanism. To operate, slide the wand to open/close the slats and rotate the wand to tilt the slats.

Download our Vertical Blinds Fitting Guide (PDF)
ROLLER BLINDS
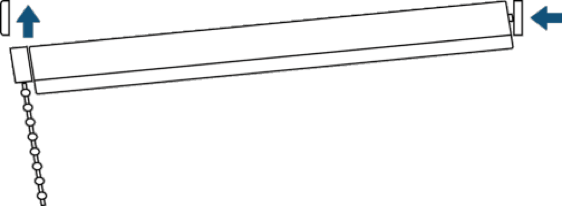
The pull control has been positioned as you requested when ordering. If you need to swap the side that the controls are on, change the roll direction or if you need to further trim the blind, simply unplug the controls from the tube. This should be done before you fix the brackets.
Decide which method of fixing you require, either TOP FIX/ FACE FIX or SIDE FIX. The blind has been supplied with universal fixing brackets to top fix into the ceiling / lintel directly above the blind, face fix onto the wall or window frame directly behind the blind or side fix into a window recess.
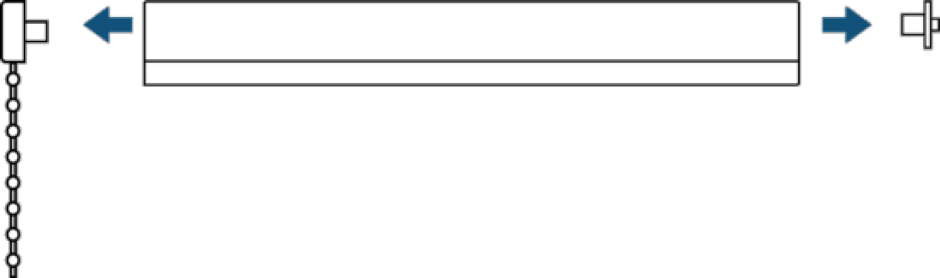
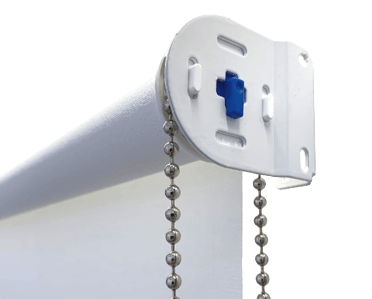
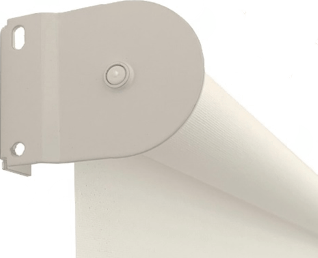
Once the brackets have been fitted, insert the blinds pin into the bracket (the pin is located at the opposite end of the blind controls). The control end will then fix into the opposite bracket.
There are two directions for roller blind fabric to immerse from their tube, these are known as ‘Standard’ or ‘Reverse’.
STANDARD
Standard sends the fabric down via the back of the tube, placing it closest to the window or wall it is mounted on. This method creates less light leakage when the blinds are mounted outside of a recess

REVERSE
Reverse places the fabric at the front of the tube therefore concealing the view of the tube. This method allows extra space fir window handles and other obstructions if you mount the blind inside a recess.

To alter the roll direction, the fabric must be fully unrolled so that the tube is revealed. Continue turning the tube in the same direction so that the fabric starts to roll up to the opposite side. To get the fabric to sit closer to the tube, run your hands along the fabric to loosely form a fold, and continue rolling the fabric back up.
CHILD SAFETY
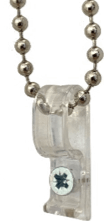
All Roller blinds are come with a ‘P’ clip to fix to the wall. It must be installed at the maximum distance possible from the control mechanism to prevent looped cords becoming slack.
Ensure the chain is fully taut when placed into position.
Attach the retaining device using suitable fixings ensuring the device is fully closed.
WARNING: In the interest of safety, please keep all pull cords and chains out of the reach of children. Move cots, beds and other furniture away from blinds and install safety devices such as cleats and cord tidies to limit access to cords.
FITTINGS
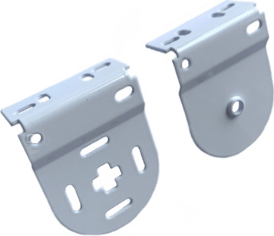
Universal Brackets
Child Safety P Clip
Download our Roller Blinds Fitting Guide (PDF)
PERFECT FIT VENETIAN BLINDS
Firstly assemble the by blind placing all components face down on a clean surface. Guide the two side channels into the exposed arms of the top frame corner joints, until they are secure and tighten the screws attached. Repeat the process with the bottom section of frame to complete the blind.
To line up the brackets, place a credit/store card vertically against the glass at the top of the window. Where the bottom of the card sits, this is the installation point for the first bracket.
Install all of the brackets provided, installing any intermediate brackets accordingly.
Once the brackets are in place, simply line up the framework with the brackets and click it into place. For Prefect Fit venetian blinds, attached the tilt wand and the blind is now ready to operate.
Download our Perfect Fit Fitting Guide (PDF)
ALLUSION™ BLINDS
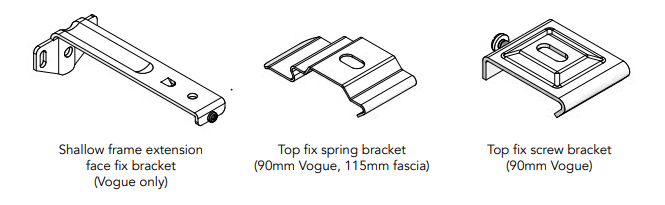
Carefully unwrap the Allusion blind and its associated brackets. There are a number of bracket options for example face fix, top fix screw or topfix spring.
FITTING THE BRACKETS
The brackets should be located to allow for the depth of the louvres on the blind to tilt. The brackets should therefore be attached to the ceiling or window frame clear from any obstruction and in line with each other.
For a blind up to 900mm wide attach two brackets fitted approximately 40mm (1½”) from each end of the blind. On wider blinds any intermediate brackets should be spaced evenly between these, and as a general rule dependant on how well the brackets are fitted, use the following as a guide:
Up to 900mm = 2 brackets.
900mm to 1600mm = 3 brackets.
1600mm to 2300mm = 4 brackets.
2300mm to 3000mm = 5 brackets.
3000mm to 3700mm = 6 brackets
Mark the bracket hole positions before drilling and plugging if necessary. Use two screws for a face fix bracket and one screw in a top fix bracket ensuring that the brackets are level. Remember to allow room for the blind to clear any obstacles
when deployed, e.g. door or window handles.
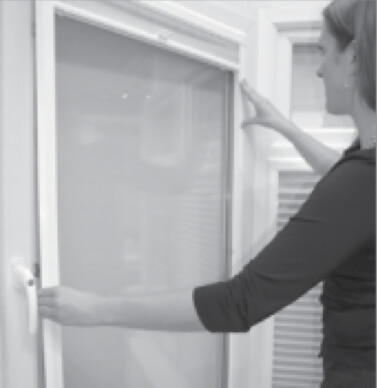
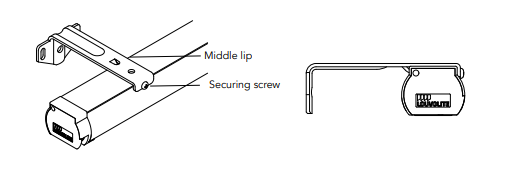
FITTING THE TRACK
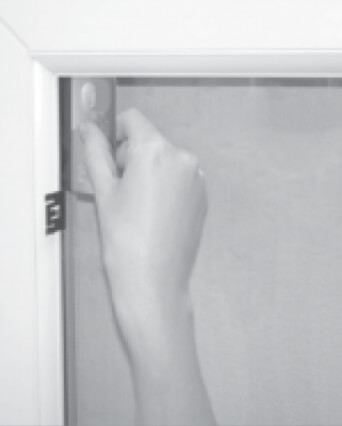
The track should be fitted into the brackets keeping the operating wand on the side of the blind as ordered (LH/RH control). If using a face fix screw bracket, locate the blind with the groove on the back of the headrail and fit it into the middle lip of the bracket. Now push the blind upwards until the headrail is sitting level on the bracket before tightening the securing screw from the front of the blind. Do not over tighten these screws, it is unnecessary and may damage the track.
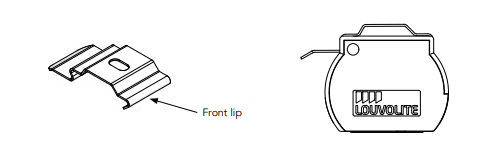
If using a top fix spring clip bracket you should push the track upwards then tilt away from you to locate the spring bracket front lip into the front groove on the track. Push upwards and the track will click into place.
FITTING THE LOUVRES
Turn the hooks on the carriers of the track so that the slots are at 90 degrees to the track. Attach a holed insert to the non holed insert on the fabric and hang this onto the end carrier.
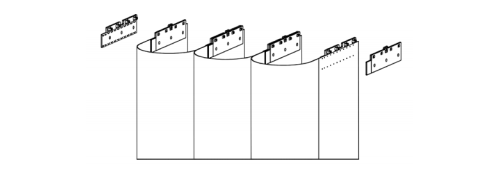
Then fit the other half of the louvre to the next carrier. Take the next louvre and snap fix the non hole insert to the holed insert on the track, repeat until you get to the last carrier/louvre. When you get to the last louvre snap fix a non holed
insert to the end louvre and fasten to the track. If the blind has a split draw then repeat for the other side of the blind ensuring the seams are all facing the same direction.
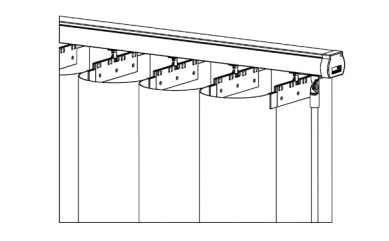
OPERATING THE BLIND
The wand system has a single wand which is used for both operations. To traverse the louvres across the track grip the wand and slide the louvres across the track by walking the wand across the blind. To move the louvres in the opposite direction walk the wand in that direction. To rotate the louvres grip the wand and twist the wand to rotate the louvres. To rotate the louvres in the opposite direction reverse the direction of twist on the wand. Note: Do not traverse the blinds with the louvres in the closed position always twist them 90 degrees to the track before operating.